Intro: SimScale for Electronics Cooling
In modern electronics design, effective thermal management isn’t just a best practice—it’s a critical requirement for performance, reliability, and safety. As components become more powerful and compact, the challenge of dissipating heat efficiently is a major hurdle for engineering teams. This is where using SimScale for electronics cooling provides a decisive advantage. As a powerful cloud based thermal analysis software, SimScale allows you to predict and solve thermal issues directly in your web browser. This electronics cooling simulation tutorial will provide a complete, step-by-step guide to get you started on your first analysis.
Step-by-Step Tutorial: A SimScale Heat Sink Simulation
To demonstrate the power and simplicity of the platform, we will walk through a common and critical task: a simscale heat sink simulation. Our specific example will be a 15W processor cooled by a passive aluminum heat sink in natural convection. This scenario is a perfect starting point for understanding the core workflow you can apply to more complex designs, including a full pcb thermal simulation online.
Step 1: Preparing & Uploading Your Geometry
Your simulation journey begins with your 3D CAD model. SimScale is compatible with a wide range of neutral CAD formats, including STEP, IGES, and Parasolid, as well as native formats from popular CAD tools.
First, ensure your model is prepared for simulation. This means removing unnecessary complexities like small fillets, logos, or screw threads that don’t impact the thermal results but can complicate the meshing process. For our example, you need a simple assembly of two bodies: the processor (a simple cube) and the heat sink it’s mounted to. Once your geometry is ready, you simply drag and drop the file directly into the SimScale workbench. The platform’s cloud-based architecture handles the upload and processing seamlessly.

Step 2: Assigning Materials & Boundary Conditions
With your geometry in place, you must tell the simulation engine how the model behaves in the real world. This is done by defining Materials and Boundary Conditions.
- Materials: Access SimScale’s extensive material library to assign properties. For our simscale heat sink simulation, you will assign “Aluminum” to the heat sink body and “Silicon” to the processor body. This defines their thermal conductivity and other physical properties.
- Boundary Conditions: This is where you define the thermal physics. You will apply a Heat Flux boundary condition to the top surface of the silicon processor, defining it as a 15W heat source. Then, you’ll define the “Natural Convection Inlet/Outlet” condition on the outer faces of the air volume surrounding the heat sink to simulate heat dissipating into the ambient air.
Step 3: Generating the Mesh
Meshing is the process of dividing your 3D geometry into thousands or millions of smaller elements. The simulation solver calculates equations on each of these elements, so a high-quality mesh is crucial for accurate results.
Fortunately, SimScale automates much of this complexity. You can choose from several meshing algorithms. For thermal analysis, the standard hex-dominant mesher is an excellent choice. You can simply set the fineness level from 1 (coarse) to 5 (fine) and let the platform handle the rest. For more advanced control, you can add “refinements” to create a finer mesh in critical areas, such as the interface between the processor and the heat sink, without adding unnecessary computational cost to the entire model.
Step 4: Running the Simulation
This is where the power of a cloud based thermal analysis software truly shines. Instead of tying up your local workstation’s resources for hours, you send the job to SimScale’s powerful cloud servers.
To start, you create a new “Run” and can configure parameters like the number of cores you want to use. A key benefit here is parallelization. You can easily duplicate your simulation setup, make a small change (e.g., test a different heat sink design or a higher power output), and run multiple simulations simultaneously without any performance loss. This allows you to explore the design space and find the optimal solution in a fraction of the time.
Step 5: Analyzing the Results (Post-Processing)
Once your simulation is complete, the Post-Processing environment allows you to visualize and understand the results. This is where you gain actionable insights into your design’s thermal performance.
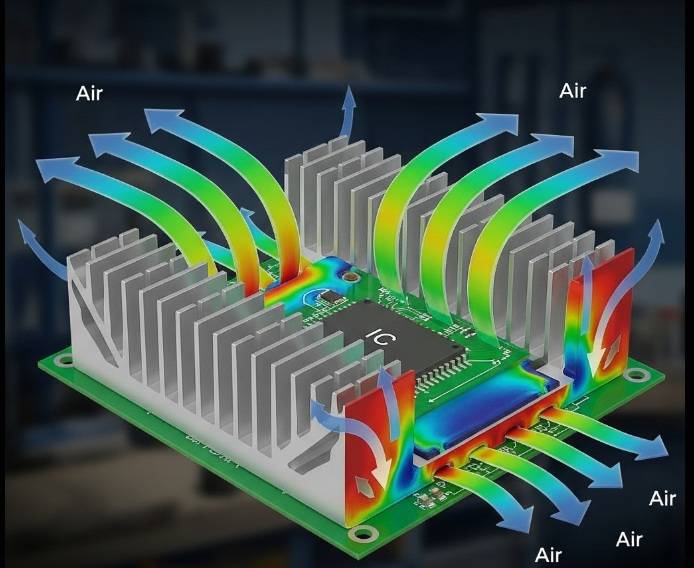
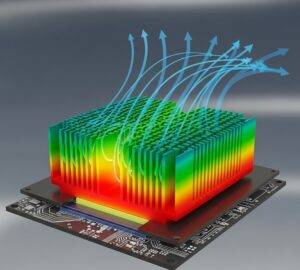
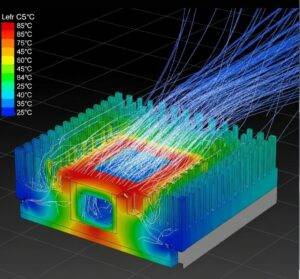
You can instantly view a 3D color plot of the temperature distribution across your components. This will clearly show you the maximum temperature of the processor and highlight any potential hot spots. You can also use “cutting planes” to see the temperature distribution inside the model or visualize heat flow vectors to understand how heat is being dissipated from the processor through the heat sink and into the surrounding air. These visualizations make it easy to validate your design and communicate the results to your team.
Conclusion: Your Path to Faster, Better Thermal Design
You’ve just walked through a complete workflow for using SimScale for electronics cooling. From CAD upload to actionable results, the entire process is streamlined within a single, browser-based environment. This powerful yet accessible approach removes the traditional barriers of high-end hardware and complex software, empowering you to perform advanced thermal analysis on everything from simple components to a full pcb thermal simulation online. By leveraging a cloud based thermal analysis software, you can iterate faster, optimize your designs more effectively, and ensure your products perform reliably.
You’ve seen the process—now apply it to your own design challenge. Test SimScale’s capabilities on your project today.
Frequently Asked Questions (FAQ)
How accurate are SimScale‘s thermal simulation results compared to experimental data?
- SimScale’s solvers are based on industry-proven open-source codes (like OpenFOAM) that have been extensively validated. When used with accurate geometry, material properties, and boundary conditions, results typically show strong correlation with experimental data, often within a 5-10% margin, which is standard for engineering simulation.
Can SimScale model fluid flow for active cooling systems (e.g., fans)?
- Absolutely. SimScale supports Conjugate Heat Transfer (CHT) analysis, which simultaneously solves for fluid flow (air or liquid) and solid-body heat transfer. This is ideal for modeling active cooling systems, including fans, blowers, and liquid cooling plates.
What computer hardware do I need to run these simulations?
- None. Because SimScale is fully cloud-based, all the computationally intensive tasks of meshing and solving are performed on SimScale’s servers. All you need is a standard computer with an internet connection and a web browser to set up, run, and analyze your simulations.

Hi, I’m [jeybee]. As a long-time resident of Seoul, I’m passionate about uncovering the authentic, everyday magic of Korea. This blog is my way of sharing my favorite spots, tips, and cultural insights with you, beyond the usual tourist traps.