DIY Kia Sorento Remote Start: Tired of hopping into a freezing cold or scorching hot car? A remote start system is a game-changer, and while you could pay a professional to install one, you can absolutely do it yourself. This comprehensive Kia Sorento remote start installation guide will walk you through every step, helping you save money and gain the satisfaction of a successful DIY project.
Before we begin, a quick but important disclaimer: You’ll be working with your vehicle’s electrical system. Be sure to follow all the instructions in this guide and, most importantly, those provided by your specific remote start kit manufacturer. If you ever feel unsure, it’s always best to consult a professional.
Tools & Materials You’ll Need:
- Your Kia Sorento remote start kit (Be sure it’s compatible with your year and trim!)
- Trim removal tool kit
- Ratchet set with various sockets
- Philips head and flathead screwdrivers
- Wire cutters and strippers
- Electrical tape
- Multimeter or test light (optional but recommended for verifying connections)
The DIY Kia Sorento Remote Start Installation Guide: Let’s Get Started
Before you start tearing into your dashboard, it’s crucial to prepare properly. A little preparation goes a long way toward a smooth installation.
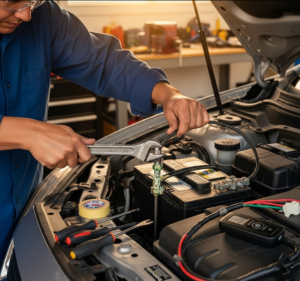
Step 1: Pre-Installation Checks & Disconnecting the Battery
First, check that your Kia Sorento remote start kit is designed for your specific vehicle year and trim. This is the single most important step to prevent headaches later on. Once you’ve confirmed compatibility, the first rule of working on a vehicle’s electrical system is to disconnect the battery. This prevents short circuits and potential damage to your car’s computer.
- Open your hood and locate the negative (-) battery terminal.
- Use a wrench to loosen the bolt on the terminal clamp.
- Carefully lift the clamp off the terminal and tuck the cable away so it can’t accidentally touch the battery post.
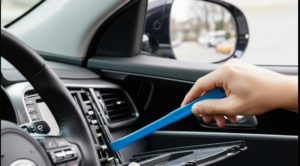
Step 2: Gaining Access to the Smart Key Module
Most modern Kia Sorento models use a smart key system, and the remote start module will connect directly to this. You’ll need to remove some plastic trim panels under the steering column to get to it.
- Use your trim removal tools to gently pry the plastic panels from the dashboard, starting at the edges.
- There may be a few screws holding the panels in place; remove them with your screwdriver.
- Be patient and work slowly to avoid breaking any plastic clips. Set the panels aside in a safe place.
- Locate the smart key module. It’s often a small black box behind a metal security plate near the ignition area. You may need to remove a few bolts to get the plate off.
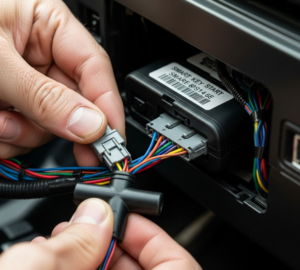
Step 3: Making the Connections
This is where the magic happens. Your remote start kit will come with a wiring harness that plugs into your vehicle’s system. The process is designed to be as plug-and-play as possible, but you’ll still need to follow the manufacturer’s instructions to the letter.
- Find the correct connectors on your remote start harness and your vehicle’s smart key module.
- Plug the new harness into the module, and then plug the module’s original harness into the new one. This creates a “T-harness” connection.
- Secure all connections tightly. Use electrical tape to wrap any exposed wires or connections to prevent them from coming loose or shorting out.
Step 4: Mounting the Remote Start Module and Tidy Up
With the connections made, you can now mount the new remote start module and tidy up the wiring.
- Find a secure, out-of-the-way place under the dashboard to mount the module. Use zip ties to secure it. Avoid mounting it in a place where it could interfere with pedals or steering column movement.
- Route all the wiring neatly. Use zip ties to bundle the cables together and secure them to existing harnesses or supports under the dash. This prevents annoying rattles and ensures wires don’t get snagged.
Step 5: Reconnecting the Battery and Programming the System
You’re in the home stretch! With the module mounted and wires secured, it’s time to test your work.
- Reconnect the negative (-) battery terminal and tighten the clamp.
- Follow your kit’s specific instructions for programming the remote start system. This often involves a series of button presses on your Kia Sorento key fob replacement or a special button on the new module itself. This process “teaches” the car’s computer to recognize the new system.
Step 6: Testing and Troubleshooting
Once programmed, test the system. The vehicle should start when you follow the remote start command (usually a sequence of presses on the key fob). If it doesn’t, don’t panic. Re-check all your connections and ensure the battery is securely fastened.
Frequently Asked Questions: Kia Sorento remote start installation guide
Q: What’s the difference between OEM and after-market Kia Sorento remote start kits?
A: OEM (Original Equipment Manufacturer) kits are made by Kia and are often integrated directly with your existing key fob and vehicle systems. Kia Sorento after-market parts, on the other hand, are made by third-party companies. They often offer more features and are usually more affordable, but may require a more complex installation.
Q: My remote start isn’t working after installation. What should I do?
A: This is a common issue. The most likely causes are a loose connection, a missed programming step, or an unprogrammed key fob. Re-check every connection, verify the negative battery terminal is tight, and re-read the programming instructions for your specific kit. For more complex issues, refer to your Kia Sorento remote start troubleshooting guide that came with the kit or search online for support for that specific brand.
Q: Do I need to program a new key fob after installation?
A: In most cases, no. Your existing key fob will likely be used to activate the remote start. However, if your kit came with its own separate remote, you would need to program that remote to work with the new module. This process is usually very simple and outlined in your kit’s instructions, similar to how you would program a Kia key fob for other functions.